Home of The Small Art Company and a bit of British all sorts about my family, kids, home, art, mixed media, craft, photography, illustration, travel, cooking, organisation, teaching... Good to see you:)

Saturday, September 7, 2013

Organza Flower Hairclip Tutorial

I'm not really a hat person, but wanted something to wear in my hair for my brother's November wedding. After some Googling, I decided to make an organza flower hairclip.


This tutorial will show you how to make such a hairclip and is based on reading and watching many others' tutorials (thank you... sorry I don't remember who you all are!) and my own experiments.

You will need:
(Ignore the glue, I didn't need this in the end!)
  • Organza (I used three colours: purple, fuchsia and lilac, but you can have just one or two)
  • Plain hairclip
  • Needle and thread
  • Small brooch, bead or button
  • Sharp scissors
  • Candle and a match
  • 5 various sized circular objects ( I used 3", 3.5", 4", 4.5" and 5")
  • Felt tip pen
Instructions:
  1. Draw around one of your circular objects on each of the colours of organza. I used 2 purple and 1 fuchsia circle in each size. It's up to you how you divide your colours, but you basically want 3 circles of each of the 5 sizes.
       
          I only used lilac for the smallest circle, so for the 3" I had 1 circle in each colour.

          Put another way:
       
          5" circle: 2 purple, 1 fuchsia
          4.5" circle: 2 purple, 1 fuchsia
          4" circle: 2 purple, 1 fuchsia
          3.5" circle: 2 purple, 1 fuchsia
          3" circle: 1 purple, 1 fuchsia, 1 lilac
 
         You should end up with 15 circles, although you may decide you want more or less. Likewise, you can choose different sizes. Your finished flower will be slightly smaller than your largest circle.

    2. Cut out each circle with a sharp pair of scissors.

    3. Then cut out a wavy edge around each circle, like this:


Other tutorials I've seen either keep the circle as it is, or cut slits into the circle, but I found this made a floppier flower than I wanted! The wavy lines gave just the effect I was after.

   4. Light your candle. You may want to have a bowl of water close by! This can be pretty dangerous, so please be careful! If you're a younger reader, please only do this under adult supervision.


   5. Take one circle and hold it a couple of inches above the flame. You'll notice how the edge scrunches up. Turn the circle so the whole edge turns in.

   6. When you've done each circle, put them into 5 piles of each size. If you've chosen different colours, now's the time to arrange them as you wish. I went for purple, purple and then fuchsia on top for each size and purple, fuchsia, lilac for the smallest.


   7. Place each group of 3 one on top of the other, largest at the bottom.


   8. When you're happy with the arrangement, take your needle and thread and sew them all together in the middle. You may need a double thread to stop it pulling through.


  9. Then take your bead, button or brooch and sew this into the centre.

  10. Turn the flower over and sew your hairclip onto the back.

  11. Wear it!

I think this is a lovely hair accessory, it's really light to wear and cost less than £5 to make:) The brooch I used is from my late nan's jewellery collection. My brother is getting married on what would have been her 96th birthday, so I'm really pleased I've been able to incorporate something of hers into my outfit.


Have fun making your own organza flower!


Thursday, July 25, 2013

Alcohol Inks and Encaustic Wax Artwork

Just a quick post to show you what I've been up to lately. I've been really enjoying experimenting with alcohol inks and encauastic wax.

I've used alcohol inks a fair bit in the past, mainly with polymer clay, but this is the first time I've used them for 'painting'. I love the unknown and unexpectedness of the inks; you never know quite how a painting's  going to turn out. And the vividness of the colours makes it lots of fun too! This is a piece I've just listed on Etsy:

 
Encaustic wax is something I've been wanting to try for a couple of years. When I was in Darwin 7 years ago I watched an artist at the market create wonderful Australian landscapes with encaustic wax (I bought one of course!) and thought it was something I'd love to try one day. Well, now I have... These are some of my Etsy listings:


And did I share my photo transfers with you? Here are two of my most popular:


Hope you like! What have you been trying out lately?


Friday, May 17, 2013

Cinnamon Swirl Recipe - Very Easy!

Once again, life has taken over and posts here just don't happen, but I thought I'd try and post a quick recipe that I made with Littlest W yesterday.

I love cinnamon swirls and this recipe was so quick and easy! It's slightly adapted from the BBC's Good Food website.

Ingredients:
  • 50g butter or margarine
  • 4 tablespoons brown sugar
  • 2 teaspoons cinnamon
  • Raisins
  • Sheet of puff pastry 320g (I used Jus-Rol)
Method:
  • Mix the butter, sugar and cinnamon together until soft.
  • Spread over the sheet of pastry.
  • Sprinkle raisins over the top.
  • Roll up into a sausage.
 
  • Slice and place onto a greased baking tray.
  • Sprinkle a little more sugar over the top.
  • Bake for 15 - 20 minutes on 200C/180C fan/gas 6.

When I make them again (as I most definitely will!) I might make a bit more mixture. You can also add some chopped almonds if you like. Highly recommended as something the kids can help with!

Monday, April 22, 2013

My new small art shop

I finally opened my new Etsy shop a few weeks ago. After a number of years of selling online, both Folksy and Etsy mainly, I never really felt I had a focus. I started with photography then added polymer clay bits and bobs and some handbound books and French memo boards... and well, anything I felt like really!


I'm still offering a variety of media, but it's all small art (including ACEOs and inchies). So much easier to market and explain to people what I do!


At the moment, my shop is mostly photo transfers on watercolour paper, but I'll be adding more on wood soon, as well as encaustic art, more polymer clay and illustrations. I've spent so long experimenting with transfers and think I've finally cracked it:)

Trying to get going with the children's book publishing again, but there's so much going on with my non-business life, it's pretty hard to fit it all in!


Anyway, please take a look at my new shop:) Love to hear what you think, as always.

Tuesday, April 9, 2013

1st Trip in the Campervan!

OK, so in my mind, before we went away to Norfolk, I was thinking of a blog post detailing the lovely, relaxing time we had in our newly refurbished campervan with lots of accompanying photos of delicious campervan-cooked meals on our new posh camping plates, the kids running around outside in the sunshine and generally happy aren't we having lots of fun photos.

Mr W even forgot the VW badge!

Isn't the reality often quite different? I don't think I have ever been so cold in my entire life. Not even when we went to Greenland or a German Christmas market. Maybe they didn't seem as bad as I expected it to  be cold...


The photos had to be taken very quickly as I didn't want to remove my gloves, even in the van! Getting a shot of the van from the outside was also a challenge if I wanted to remain with my family, rather than being blown away over the cliff edge. Hmm, you get the idea!

It was challenging to say the least, but we learnt a lot about how to prepare for next time. Yep, there will be a next time, but I promised the little Ws that it will be a whole lot warmer...

Sunday, February 10, 2013

A Peek into my Sketchbooks and Notebooks...

A while ago, Silver Moss Jewellery shared her notebook and I said I would do the same. I think a lot of crafty folk quite enjoy having a nose at how others work, be it their sketchbooks or work spaces.

My sketchbooks aren't all that interesting from the outside I'm afraid! Here they are:


The large grey one Mr W gave to me. Not as a present! I needed a notebook, he had one lying around... So, what's in this one exactly? Well, anything and everything to do with my art and craft business really. Sketches, website layouts, avatar and banner designs, craft fair table layouts, costings, tutorials, quotes, acetate images, photos, to do lists, business plans... You get the idea!
  • Costings and Christmas ideas:
  

  • Sketches for glass painting and an experiment from my Folk of the Forest range:

  • Tasmanian Devil images for a polymer clay model someone commissioned, photo of polymer clay Christmas wine glass charms, some mini photos and a teddy bear ready for tracing onto acetate: 


  • Book binding instructions, quotes and giraffe for glass painting:


The white one is actually rather lovely. It's from the White Collection, a present from my mum and dad. This one is mostly for polymer clay designs, usually in colour!


I always date everything. These pages are 5 years old already. Wow!
Then I have a few notebooks with little camera images all over them. An old colleague gave me a few of these. I think she'd been given a load and didn't quite know what to do with them! In here I write down camera techniques. Despite being an avid photographer for many years, I still find it hard to remember what buttons to press to get certain effects. I just don't have that sort of brain! The other one has blog ideas. I have a similar notebook for my children's book ideas as well.

The top notepad is one of my handmade books. The cover is a photo of a beautiful Canadian lake. My first ever Folksy sale was a set of these notebooks actually. This one contains mostly lists - swaps, blogs, shopping lists, to make...


What I realised when I looked through these books is just how many crafts I've tried over the years. There are notes on jewellery-making, Fimo, photography, glass painting, book binding, image transfers, illustrations, painting, French memo boards... all sorts!

I thought about starting a new book for The Small Art Company, which is now my focus, but rather than being a completely new venture, I feel it's more of a continuation of what I've always done. It's built on what I've learnt and the many failed experiments... My art and craft has been one long journey, so it makes more sense to just carry on in my old trusty books...

Anyone else want to share their sketchbooks??


Saturday, February 9, 2013

My First Graze Box! And a free one for you...

I heard of graze boxes ages ago, but only got round to ordering one when I got a free code the other day. If something's free then why not?!

A graze box is basically a little box of healthy snacks. You can choose the snacks you want online (a very easy process) and then they deliver your box twice a week.


You get 4 snacks:


 We had The Firecracker: spicy paprika peanuts, salsa corn sticks and korean chilli rice crackers


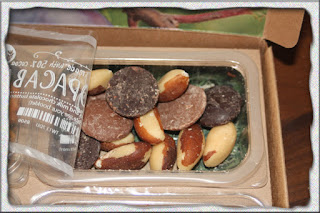
Copacabana: milk chocolate buttons, dark chocolate buttons and brazil nuts


Summer Berry Compote: berry compote with wholemeal shortbread dippers


Apple Crumble: raisins, cinnamon and honey almonds and apple

 
I have to say, they were really yummy! They're just the right size for snacking at work, although being at home more than being at work, I could quite easily get through the whole box in one go...

Second box came today and in it is: Lemon and Poppy, Cookies and Cream, Tom Yum Yum and Eton Mess.

The usual cost is £3.89, including delivery and they send twice a week. They sent me this code to share with people and you'll get a free box: 5RQR5XMD (UK only). Just visit Graze here.

It's a really simple and straightforward site and you can cancel at any time. Give it a go and let me know what you think!

PS Next post is about my sketchbook and notepads that I promised someone ages ago!