
Yep, I still can't believe it, at the age of 30-something (closer to 40 than 30!) I finally got around to learning to drive. Well, I say 'finally got around to' but it was never something I had any inclination to do. I really never in a million years thought I would ever learn; the whole thing looked so difficult and scary. There are other reasons I never wanted to learn to drive, but I won't go into them now.
Anyway, life is already so much easier now I have wheels! Since September I've been doing a 4-hour round trip on 6 buses to collect Little W from her Nursery speech unit. That journey is now an hour!
Although I mostly don't miss the buses, there are some characters I've met that are quite memorable! I thought I'd remember them here... There was the man who was deaf and noticed Little W using sign language. He asked if she was deaf, I signed no and wished I could remember all the sign language I'd learnt on my BSL course! He told me his dog recognised signs as well. Then there was the well-spoken man who came from London (like me) and lived in California for many years. The woman who grabbed my arm at the bus station and wanted me to walk her and her trolley to the next stop. Oh and the man who handed me a load of receipts and asked me to add them up! The man in a wheelchair who told me my smile brightened his day:) The groups of elderly people who complained about the schools being on strike and stating 'teachers get enough holidays'. Seeing as they weren't talking directly to me, I did everything I could to hold my tongue!! As if we strike for a day's holiday! And then there was the girl who was fast asleep, woke up and asked where we were. Had a chat about her having moved house and how she was on her way to the job centre. There are many more people who have made my long journeys slightly less dull, but I'll stop there for now:)
Wednesday, March 19, 2014
Friday, January 31, 2014
Art Journalling
When Zoe from Top Floor Treasures asked for guest bloggers on art journalling I ummed and arrhed (not sure how you spell that, but you know what I mean!) as I don't really consider myself an art journaller, having just started at the beginning of the month, but I offered to write a post from a newbie's perspective.
Luckily, Zoe was happy to have me:) Here's my post which you may find interesting if you're also new to art journalling. But please take a look around Zoe's blog and Facebook page. She's a truly talented mixed media artist!
Luckily, Zoe was happy to have me:) Here's my post which you may find interesting if you're also new to art journalling. But please take a look around Zoe's blog and Facebook page. She's a truly talented mixed media artist!
Saturday, January 18, 2014
How to make stencils with polymer clay
I've done a few polymer clay tutorials but thought this one would be useful for anyone interested in mixed media and art journalling.
Stencils tend to be used a lot in mixed media but can be quite expensive. Always one to try and use everyday household items, I've been stencilling with satsuma and onion netting, my children's plastic stencils, paper doilies (ok, not exactly an everyday item, but cheap nonetheless!) and while not a stencil, bubblewrap gives a stencil-like effect.
Anyway, this is a great way to use up scrap clay and create your own unique stencils.
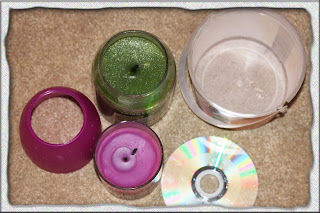
You need:


and here's all the patterns made by my stencils:

I messed up the bottom right corner as the spray on my ink didn't work properly! The good thing about mixed media work is that you can just cover it up:) I'm really pleased with how they turned out and can't wait to use them in my art journal.
You'll find that there's a bit of ink left on the stencil, so wipe this off with a paper towel or blot with paper and use this in your next project!
Hope this has been useful. I'd love to see what stencils you create. Have fun! And don't forget to come and join in The Documented Life Project...
Stencils tend to be used a lot in mixed media but can be quite expensive. Always one to try and use everyday household items, I've been stencilling with satsuma and onion netting, my children's plastic stencils, paper doilies (ok, not exactly an everyday item, but cheap nonetheless!) and while not a stencil, bubblewrap gives a stencil-like effect.
Anyway, this is a great way to use up scrap clay and create your own unique stencils.
You need:
- Polymer clay (I use Fimo but any brand will work of course)
- Cutters (I mostly used polymer clay cutters, but you can use anything at all: cocktail stick, pen lid, small jar lid, cocktail stick container, old film container... anything really!)
- Rolling pin (you could use a jar if you don't have a rolling pin)
- Tissue blade (not essential but useful to remove stencil from work surface to baking tray)
- Heavy books
- Condition your clay. Mine was quite old so I had to spend a while rolling it around and warming it up a bit.
- Roll it out to your desired size. My largest stencil (the bubble one) is about 14cm x 10cm / 5.5" x 4" and about 1mm thick.
For the bubble stencil I used several circular cutters, a cocktail stick and another pointed tool.
- Then carefully cut out your shapes. I would perhaps recommend leaving a wider edge between the holes and the outside edge as otherwise you may get lines when you spray. You can always place a piece of paper underneath the edge to prevent this though.
Anticlockwise from top left: Stars, hearts, flowers made with circle and raindrop cutters and a swirly shape I cut out with a blade)
Left to right: Zig zag lines made with a zig zag tissue blade, butterflies, squares and bubbles.
- Even more carefully (!) pick up your stencil and place on baking tray. You may need to slide a tissue blade underneath. Alternatively, you might prefer to cut out the shapes on your baking tray so you won't have to move the stencil.
- Bake for recommended time. Fimo takes half an hour.
- IMPORTANT! Once baked, place some heavy books on top of your stencils. Polymer clay is quite flexible when it comes out of the oven and if you leave something thin like stencils, they will bend, which is no good for stencilling! I left mine under the books for about half an hour.
- Now the fun part! I used Dylusions ink sprays on 150gsm watercolour paper (this is something I painted ages ago with watercolours, just to use one day as a background):
and here's all the patterns made by my stencils:
I messed up the bottom right corner as the spray on my ink didn't work properly! The good thing about mixed media work is that you can just cover it up:) I'm really pleased with how they turned out and can't wait to use them in my art journal.
You'll find that there's a bit of ink left on the stencil, so wipe this off with a paper towel or blot with paper and use this in your next project!
Hope this has been useful. I'd love to see what stencils you create. Have fun! And don't forget to come and join in The Documented Life Project...
Tuesday, January 14, 2014
Mixed Media and an Art Journal Project!
Well, happy New Year! I think this must be the longest I've not blogged for. Sometimes life just gets in the way, but I have missed sharing things with anyone who might be reading (!) and catching up on what my favourite bloggers are up to.
I've been really enjoying working and experimenting with mixed media. It's something I've been dabbling with for a few years, in different forms, but am doing it more seriously now. I even sold this piece in Things British at King's Cross:

And I've sent this piece off to the shop today:

I've managed to sell a few encaustic pieces and some alcohol ink tiles as well. I'll be visiting the shop in a few weeks and can't wait to see my things there! I've never made it up to the Gift Gallery in York, so I'm really excited to see my work in a real shop!
I'm also taking part in an art journal project. Zoe over at Top Floor Treasures mentioned it and I thought it sounds just like my kind of thing! Despite keeping all sorts of diaries and journals since the age of 12, I've never actually made an art journal. I half-made a smash book a few years ago, but it remains half-made...
Anyway, here's the cover:

It's titled 'A Year of Hope' which relates to my daughter. Maybe more about that another time.
If you're unsure what an art journal is, it's basically a journal that you create art in. So you could have a daily planner which you decorate with doodles, or you can write journal-type entries and decorate the pages in any way you like really. You can add things like tickets, photos, quotes, stickers... anything that is meaningful to you at the time.
For this project we're given weekly challenges. The first for example, was to incorporate our front door.
This week's challenge is to use an envelope. I love this one and have an idea in mind. Just need to wait for the right kind of envelope! I've never wanted junk mail so much:) It's been so interesting to see everyone's different ideas using the same prompt!
If you want to find out more about the Documented Life Project, then you can find them on Facebook on on the blog.
It's not too late to come and join in:)
I've been really enjoying working and experimenting with mixed media. It's something I've been dabbling with for a few years, in different forms, but am doing it more seriously now. I even sold this piece in Things British at King's Cross:
And I've sent this piece off to the shop today:
I've managed to sell a few encaustic pieces and some alcohol ink tiles as well. I'll be visiting the shop in a few weeks and can't wait to see my things there! I've never made it up to the Gift Gallery in York, so I'm really excited to see my work in a real shop!
I'm also taking part in an art journal project. Zoe over at Top Floor Treasures mentioned it and I thought it sounds just like my kind of thing! Despite keeping all sorts of diaries and journals since the age of 12, I've never actually made an art journal. I half-made a smash book a few years ago, but it remains half-made...
Anyway, here's the cover:
It's titled 'A Year of Hope' which relates to my daughter. Maybe more about that another time.
If you're unsure what an art journal is, it's basically a journal that you create art in. So you could have a daily planner which you decorate with doodles, or you can write journal-type entries and decorate the pages in any way you like really. You can add things like tickets, photos, quotes, stickers... anything that is meaningful to you at the time.
For this project we're given weekly challenges. The first for example, was to incorporate our front door.
This week's challenge is to use an envelope. I love this one and have an idea in mind. Just need to wait for the right kind of envelope! I've never wanted junk mail so much:) It's been so interesting to see everyone's different ideas using the same prompt!
If you want to find out more about the Documented Life Project, then you can find them on Facebook on on the blog.
It's not too late to come and join in:)
Saturday, September 7, 2013
Organza Flower Hairclip Tutorial
I'm not really a hat person, but wanted something to wear in my hair for my brother's November wedding. After some Googling, I decided to make an organza flower hairclip.

This tutorial will show you how to make such a hairclip and is based on reading and watching many others' tutorials (thank you... sorry I don't remember who you all are!) and my own experiments.
You will need:
 (Ignore the glue, I didn't need this in the end!)

I only used lilac for the smallest circle, so for the 3" I had 1 circle in each colour.
Put another way:
5" circle: 2 purple, 1 fuchsia
4.5" circle: 2 purple, 1 fuchsia
4" circle: 2 purple, 1 fuchsia
3.5" circle: 2 purple, 1 fuchsia
3" circle: 1 purple, 1 fuchsia, 1 lilac
You should end up with 15 circles, although you may decide you want more or less. Likewise, you can choose different sizes. Your finished flower will be slightly smaller than your largest circle.
2. Cut out each circle with a sharp pair of scissors.
3. Then cut out a wavy edge around each circle, like this:

Other tutorials I've seen either keep the circle as it is, or cut slits into the circle, but I found this made a floppier flower than I wanted! The wavy lines gave just the effect I was after.
4. Light your candle. You may want to have a bowl of water close by! This can be pretty dangerous, so please be careful! If you're a younger reader, please only do this under adult supervision.

5. Take one circle and hold it a couple of inches above the flame. You'll notice how the edge scrunches up. Turn the circle so the whole edge turns in.
6. When you've done each circle, put them into 5 piles of each size. If you've chosen different colours, now's the time to arrange them as you wish. I went for purple, purple and then fuchsia on top for each size and purple, fuchsia, lilac for the smallest.


7. Place each group of 3 one on top of the other, largest at the bottom.
8. When you're happy with the arrangement, take your needle and thread and sew them all together in the middle. You may need a double thread to stop it pulling through.

9. Then take your bead, button or brooch and sew this into the centre.
10. Turn the flower over and sew your hairclip onto the back.
 11. Wear it!
I think this is a lovely hair accessory, it's really light to wear and cost less than £5 to make:) The brooch I used is from my late nan's jewellery collection. My brother is getting married on what would have been her 96th birthday, so I'm really pleased I've been able to incorporate something of hers into my outfit.

Have fun making your own organza flower!

This tutorial will show you how to make such a hairclip and is based on reading and watching many others' tutorials (thank you... sorry I don't remember who you all are!) and my own experiments.
You will need:

- Organza (I used three colours: purple, fuchsia and lilac, but you can have just one or two)
- Plain hairclip
- Needle and thread
- Small brooch, bead or button
- Sharp scissors
- Candle and a match
- 5 various sized circular objects ( I used 3", 3.5", 4", 4.5" and 5")
- Felt tip pen
- Draw around one of your circular objects on each of the colours of organza. I used 2 purple and 1 fuchsia circle in each size. It's up to you how you divide your colours, but you basically want 3 circles of each of the 5 sizes.


I only used lilac for the smallest circle, so for the 3" I had 1 circle in each colour.
Put another way:
5" circle: 2 purple, 1 fuchsia
4.5" circle: 2 purple, 1 fuchsia
4" circle: 2 purple, 1 fuchsia
3.5" circle: 2 purple, 1 fuchsia
3" circle: 1 purple, 1 fuchsia, 1 lilac
You should end up with 15 circles, although you may decide you want more or less. Likewise, you can choose different sizes. Your finished flower will be slightly smaller than your largest circle.
2. Cut out each circle with a sharp pair of scissors.
3. Then cut out a wavy edge around each circle, like this:

Other tutorials I've seen either keep the circle as it is, or cut slits into the circle, but I found this made a floppier flower than I wanted! The wavy lines gave just the effect I was after.
4. Light your candle. You may want to have a bowl of water close by! This can be pretty dangerous, so please be careful! If you're a younger reader, please only do this under adult supervision.

6. When you've done each circle, put them into 5 piles of each size. If you've chosen different colours, now's the time to arrange them as you wish. I went for purple, purple and then fuchsia on top for each size and purple, fuchsia, lilac for the smallest.


7. Place each group of 3 one on top of the other, largest at the bottom.
8. When you're happy with the arrangement, take your needle and thread and sew them all together in the middle. You may need a double thread to stop it pulling through.

9. Then take your bead, button or brooch and sew this into the centre.
10. Turn the flower over and sew your hairclip onto the back.

I think this is a lovely hair accessory, it's really light to wear and cost less than £5 to make:) The brooch I used is from my late nan's jewellery collection. My brother is getting married on what would have been her 96th birthday, so I'm really pleased I've been able to incorporate something of hers into my outfit.

Have fun making your own organza flower!
Thursday, July 25, 2013
Alcohol Inks and Encaustic Wax Artwork
Just a quick post to show you what I've been up to lately. I've been really enjoying experimenting with alcohol inks and encauastic wax.
I've used alcohol inks a fair bit in the past, mainly with polymer clay, but this is the first time I've used them for 'painting'. I love the unknown and unexpectedness of the inks; you never know quite how a painting's going to turn out. And the vividness of the colours makes it lots of fun too! This is a piece I've just listed on Etsy:

Encaustic wax is something I've been wanting to try for a couple of years. When I was in Darwin 7 years ago I watched an artist at the market create wonderful Australian landscapes with encaustic wax (I bought one of course!) and thought it was something I'd love to try one day. Well, now I have... These are some of my Etsy listings:


And did I share my photo transfers with you? Here are two of my most popular:

 Hope you like! What have you been trying out lately?
I've used alcohol inks a fair bit in the past, mainly with polymer clay, but this is the first time I've used them for 'painting'. I love the unknown and unexpectedness of the inks; you never know quite how a painting's going to turn out. And the vividness of the colours makes it lots of fun too! This is a piece I've just listed on Etsy:
Encaustic wax is something I've been wanting to try for a couple of years. When I was in Darwin 7 years ago I watched an artist at the market create wonderful Australian landscapes with encaustic wax (I bought one of course!) and thought it was something I'd love to try one day. Well, now I have... These are some of my Etsy listings:
And did I share my photo transfers with you? Here are two of my most popular:
Friday, May 17, 2013
Cinnamon Swirl Recipe - Very Easy!
Once again, life has taken over and posts here just don't happen, but I thought I'd try and post a quick recipe that I made with Littlest W yesterday.
I love cinnamon swirls and this recipe was so quick and easy! It's slightly adapted from the BBC's Good Food website.
Ingredients:


When I make them again (as I most definitely will!) I might make a bit more mixture. You can also add some chopped almonds if you like. Highly recommended as something the kids can help with!
I love cinnamon swirls and this recipe was so quick and easy! It's slightly adapted from the BBC's Good Food website.
Ingredients:
- 50g butter or margarine
- 4 tablespoons brown sugar
- 2 teaspoons cinnamon
- Raisins
- Sheet of puff pastry 320g (I used Jus-Rol)
- Mix the butter, sugar and cinnamon together until soft.
- Spread over the sheet of pastry.
- Sprinkle raisins over the top.

- Roll up into a sausage.

- Slice and place onto a greased baking tray.
- Sprinkle a little more sugar over the top.
- Bake for 15 - 20 minutes on 200C/180C fan/gas 6.

When I make them again (as I most definitely will!) I might make a bit more mixture. You can also add some chopped almonds if you like. Highly recommended as something the kids can help with!
Subscribe to:
Posts (Atom)


