Home of The Small Art Company and a bit of British all sorts about my family, kids, home, art, mixed media, craft, photography, illustration, travel, cooking, organisation, teaching... Good to see you:)
Showing posts with label butterfly. Show all posts

Thursday, February 9, 2012

Transferring Photos onto Polymer Clay Tutorial

Transferring photos onto polymer clay is really easy! I'll show you here how to do it. I did a bit of an experiment, so you can see the outcomes of 3 different papers and inks.

I first tried transferring images a few years ago, using transfer paper. Here are some of the things I made:


They turned out well, but transfer paper is expensive. I liked the sharpness of the images, but for my current projects, I was after something less... perfect. So, I've done some research and experimentation and here are the results...

You'll need:

Essential:

  • White or light-coloured polymer clay
  • Rolling pin
  • Images
  • Cold water
Optional:

  • Pasta machine
  • Tile
  • Tissue blade
  • Liquid polymer clay
  • Varnish
The first paper I used was Kodak photo paper, using a black and white image (beach, see below) printed on my inkjet. Second, I used a colour inkjet image (cupcake) on ordinary copier paper and thirdly, I used a colour laserjet image (flower). OK, so it's not an entirely fair test for all you scientists who might be reading. I know I should have used the same image each time! But I was still able to get a good idea of how well the images transfer.

Step 1

Roll out some white or light-coloured polymer clay. I use Fimo. You can use your pasta machine for this (please don't use it for food afterwards!) or just roll it out with a rolling pin.

Step 2
If you're using photo paper, take a tile, place the clay (cut to the size and shape you require) on top and spread out liquid clay on top of that:


Place the image face down.

For laserjet and inkjet images, just place the images face down on the rolled out clay; no need for the liquid clay.


Left to right above: laserjet, inkjet.

Step 3
For the photo paper, rub the back gently. Don't remove the image for this one.

For the inkjet and laserjet images, press down firmly but not too hard, otherwise you'll distort the clay, then wet your finger with cold water and rub the backs of the images.

For the laserjet image, I found the paper rubbed away in little bits and left a colour image behind (see top flower pic below). For the inkjet image, the paper lifted off in one piece and just left black outlines, as you can see below:


Step 4
With a tissue blade you can then trim around the image to the exact shape and size you want.


Step 5
Place the tiles in the oven and bake according to the manufacturer's instructions. Tiles aren't essential, but they do keep the clay flat.

Step 6
After baking, you can now peel off the photo paper. This one didn't quite work, as you can see (far left):


I've since read that Kodak paper doesn't work, which is what I used. It's worth trying the same method with other photo papers though, as these may give really great results.

As it is, I'm really pleased with the way the others turned out. The laserjet is in colour and quite rough, not smooth like the images I first did on transfer paper a few years ago. The inkjet images I'm also really pleased with, even though they're just black outlines. This is exactly what I wanted for my current projects.

Once your projects are finished, I recommend varnishing them to prevent the images wearing off.

So there you have it - a very simple way to transfer images onto polymer clay. No need for expensive papers or liquid clays either:)

To summarise:

Transfer paper - gives a sharp, colour image, but is a little expensive.
Photo paper - Kodak paper doesn't work, but others might. Need liquid clay for this however.
Laserjet copies - full colour transfer, a little rough.
Inkjet copies - only the black transfers.

Hope you enjoyed reading. Please take a look at some of my work with photo transfers, here in my Etsy shop and here in my Folksy shop. These have all been made using laserjet copies. I altered my photos to black outlines before transferring. I like the black for these particular projects, although you can see one colour image as well...


I've got another polymer clay tutorial lined up - Mokume Gane - coming soon!


Friday, November 4, 2011

Altered Photography and Coptic Bound Books

I logged on to the PC today to find I'd had 7 sales! Think that must be an online record for me!

This week I've relaunched my Folksy shop. I said a few weeks ago that I was going to concentrate on handbound books and while they will be a lot of what I sell, I realised that I didn't want to be restricted, so I'm branding myself as mixed media art and gifts. I hope this combines the type of things I like to make. I want to make sure I can include altered imagery, polymer clay, glass paints, fabric and watercolour (they're the main materials I like to use!).

So, here are some of the books I've made:


I love the Coptic stitching! On the fronts are some of my altered photos. At the moment I've just used a distressing technique on two of them and two others are my glass painted photos. The fifth book has no photo - just pretty paper!

And here's an ACEO I listed today:

Again, I've used one of my photos and altered it (digitally this time) to create a unique image. The pink swirls are actually a photo of a colourful glass exhibit I saw at Kew Gardens a few years ago.

I've got many more images that I'm having lots of fun altering. I'm thinking of selling these images as sheets of paper for people's crafty needs.

Here's another ACEO I made with one of the butterfly images I took last week:

The only thing I'm not sure about now is the banner. I wanted something that covers everything, but also wanted to include Frederick Frog as he's my avatar and I didn't want to change him... But the white background, whilst it looks OK on Folksy, it doesn't look right here! I wonder how people manage to get their branding right so it fits everywhere?! I guess I could change the blog background, but I like it as it is... Then there's the shop name... I want to change it, but then I can't change my blog or Facebook... and on Folksy people will still see me as Careford Creations as that's my username. Aaaarrghh!

Saturday, October 29, 2011

Butterflies and Enchanted Gardens

It's been a funny old month weather-wise. Paddling pool, BBQ and picinic at the beginning of October and a beautiful warm sunny day yesterday. We decided to make the most of the good weather and half-term and went to Butterfly World near St. Alban's.

I went once before when I was little, but didn't remember much of it. It's an ideal place for a day out. There's enough to see, but not so much that you're rushing to get round everything. Little W loved the playground and craft activities. And I loved the gardens. Just thought I'd show you some pics I took of my favourite one - the Enchanted Garden. Each section was made to look like a room in a house which had merged with the garden...


The other interesting garden was this one, which is a back view, but it had lots of giant garden bits and pieces. I love anything with an other world feel (hence my Folk of the Forest shop!).


And then we saw these stuck in the wall..!


Of course, the butterflies themselves are beautiful! They fly all around you and some are huge! I was able to get a few good photographs, which will be ideal for my new projects. I was hoping my shop relaunch would be the end of this month, but I might not make it... I keep changing my mind about the shop's tag line. I may go with something about mixed media, instead of just altered photography. Hmm, we'll see...


(Available to buy as always:) Just e-mail for details: victoria@carefordcreations.co.uk)

Tuesday, August 30, 2011

Pencils and Cheese

Pencils and cheese – completely unrelated, but two things on our recent holiday in the beautiful Lake District. The Lakes is one of my favourite places in the whole world. Even when it rains (which it does a lot), it is still charming.

We stayed in Ullswater this time, in a lovely little cottage with stone floors and big wooden doors, not to mention the open fireplace. I can just imagine how cosy it must be to come in from a blizzard and sit in front of the fire... This is a pic of our cottage in the distance:

One of the places we wanted to visit was the pencil museum in Keswick. I went there when I was younger and wanted my own children to take a trip there too and see the world’s largest pencil! I also wanted to go again as an adult to fully appreciate my wonderful new colouring pencils!


A while ago I ordered two tins of pencils for my children’s book illustration course. One set is Derwent Coloursoft, which have a gorgeous velvety feel when you put pencil to paper and the other set is Derwent Pastel pencils, which are basically pastels in pencil form. Both sets are a joy to use and I highly recommend them. It was really interesting to learn about how these pencils are made and visit the place where they come from. As well as using the pencils on my course, I’m also planning to use them in my new(ish) shop on Folksy – Dear Duck Illustration... At the moment I’m just selling watercolour artwork, but hope to add some pencil work soon.

Anyway, back to the Lakes... We met a couple of interesting people, one up a mountain. He started talking to my dad when he saw us using a back carrier for Baby W. The man said that he actually invented the baby back carrier when he had to rescue a man with a young child, by cutting two holes in a rucksack to stick the child's legs through and carry him. Unfortunately, he took the idea to a well-known outdoor company who weren't interested, only for them to come up with the idea themselves some months later. Hmm.

We did a lot of walking/hiking as usual on our holidays! Here’s a pic I took in Grizedale Forest:

I would recommend Grizedale if you have young children but still want to go walking without too much danger. There are a number of marked trails of varying difficulty. We did a 4-mile strenuous walk with a 3-year-old and he was fine. There are lots of pieces of art to look out for along the way as well. Sorry, I should have taken more photos!

On the way home we stopped off at the Wensleydale Creamery in Hawes, Yorkshire. OK, so it’s not the Lakes, but I thought I would just add it in to say how delicious their cheese is! Of course, you will know of Wensleydale from Wallace and Gromit. The museum tells the history of cheese-making in the area and there are a number of interesting artefacts to look at too, as well as viewing cheese-making in progress. Then you come to the cheese tasting area... There are so many cheeses and I thought all but one (the blue vein one) were yummy. Here are the four cheeses we bought:

From left to right: Wensleydale Special Reserve, Pineapple Twist, Wensleydale and Cranberries and Wensleydale and Ginger. My favourite is the cranberry one, closely followed by the pineapple. I'm wishing we'd bought the chive and onion one too. Oh well!

This time it was my mum who got talking to someone in the cheese tasting area. My parents must have a certain look about them! This man grew up with Kit Calvert who was responsible for saving the dairy from closure in the 1930s.

I also bought my children a cheese recipe book. We might try and have a go at making some of the recipes soon. I’ll be sure to post the outcomes here.

Well, that was just a little bit from our hols. We also visited a waterfall called Aira Force. I’m planning to do a short post in a few days about how to photograph waterfalls, so keep an eye out for that if you’re interested.

Wednesday, February 3, 2010

Christals Creations

Way back in June I received a blog award from Fiona at Christals Creations. I never got around to sending the award on, but have been meaning to feature Fiona's Folksy shop for ages as a thank you, so here we are!

Fiona makes and sells gorgeous jewellery and tiaras. She's experimented with silver, beads and crystals and many beautiful pieces can be bought on Folksy.

Here are a few of my favourites...

First is this lovely butterfly bracelet. I love yellow and butterflies!


These earrings are made from swarovski crystals. I love the shape of them as well as the name - 'Pink Passion'!


And lastly are these copper and green earrings, made from twisted wire and seed beads. I love the colours and the twisty bit!


Make sure you go and have a look at Fiona's shop at the rest of her creations!

Monday, November 30, 2009

Photo Coasters - Perfect Christmas Present!

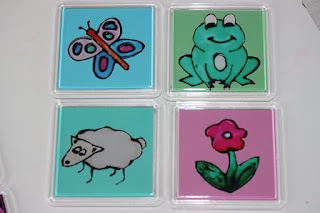
I'm really pleased with these 3 sets of coasters I've made. Well, I say 'made', but I guess I just put my photos in them! Hence the reason I won't be listing them on Folksy, but if you would like to buy a set, then I'll be putting them on my website. Just give me a couple of hours!
Here's the first set. These would make perfect additions to your Christmas table. They were designed using my glass painting and photographing technique:


Then there's this flower set, which would make a lovely gift for your mum or nan:


And lastly, a collection of my children's prints. I call them children's prints, but to be honest, I think many adults would love them too!


I've also finally managed to make and send two decorations in the Folksy Decoration Swap. I'll blog about them once the recipients have received them.

Other than that, am pleased the gift fair's out of the way so I can start on a big tidy up!